User Management
A "user seat" refers to a license for a single user within an organization. A user seat, while occupied by a member of your organization, grants that member access to Bitwarden services under your specific plan. A user seat is not permanently attached to that member; when they leave the organization that user seat is made available for use by a new member.
Bitwarden cloud Teams and Enterprise organizations will automatically scale up user seats as you invite new users. You can set a seat limit on scaling to prevent your seat count from exceeding a specified number, or manually add seats as desired. Regardless of how you choose to add seats, you will need to manually remove seats you're no longer using.
Adding and removing user seats will adjust your future billing totals. Adding seats will immediately charge your payment method on file at an adjusted rate so that you will only pay for the remainder of the billing cycle (month/year). Removing seats will cause your next charge to be adjusted so that you are credited for time not used by the already-paid-for seat.
note
Only an an organization owner or provider service user can add or remove seats, as this directly affects billing.
note
The number of seats a self-hosted organization has will always mirror its counterpart cloud-organization. You will be required to manage your seat count through the cloud Admin Console, however billing sync can be setup to make these changes reflect for your self-hosted organization without requiring you to re-upload you license.
To set a limit on the number of seats your organization can scale up to:
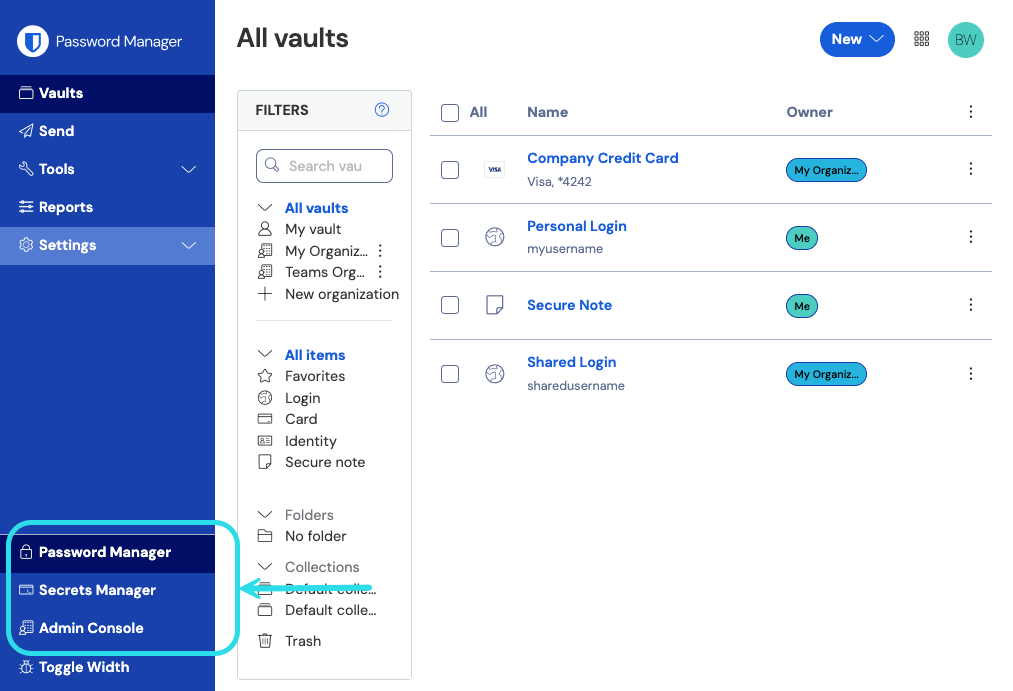
Log in to the Bitwarden web app and open the Admin Console using the product switcher:

Product switcher Navigate to Billing → Subscription and check the Limit subscription checkbox:

Set a seat limit In the Seat limit input, specify a seat limit.
Select Save.
note
Once the specified limit is reached, you will not be able to invite new users unless you increase the limit.
note
The number of seats a self-hosted organization has will always mirror its counterpart cloud-organization. You will be required to manage your seat count through the cloud Admin Console, however billing sync can be setup to make these changes reflect for your self-hosted organization without requiring you to re-upload you license.
To manually add or remove seats to your organization:
Log in to the Bitwarden web app and open the Admin Console using the product switcher:

Product switcher Navigate to Billing → Subscription.
In the Subscription seats input, add or remove seats using the hover-over arrows:

Add or remove seats Select Save.
note
If you are increasing your Subscription seats above a specified Seat limit, you must also increase the seat limit so that it is equal to or greater than the desired subscription seat count.
To ensure the security of your organization, Bitwarden applies a 3-step process for onboarding a new member, invite → accept → confirm.
tip
This document covers the manual onboarding flow for adding users to Bitwarden organizations, however Bitwarden offers two methods for automatic user and group provisioning:
Teams and Enterprise organizations can use SCIM integrations for Azure AD, Okta, OneLogin, and JumpCloud.
Teams and Enterprise organizations can use Directory Connector for Active Directory/LDAP, Azure AD, Google Workspace, Okta, and OneLogin.
tip
For Enterprise organizations, we recommend configuring enterprise policies prior to inviting users to ensure compliance on-entrance to your organization.
To invite users to your organization:
Log in to the Bitwarden web app and open the Admin Console using the product switcher:

Product switcher Navigate to Members and select the Invite User button:

Invite member to an organization On the Invite user panel:
Enter the Email address where new users should receive invites. You can add up to 20 users at a time by comma-separating email addresses.
Select the Member role to be applied to new users. Member role will determine what permissions these users will have at an organizational level.
In the Groups tab, select which groups to add this user to.
In the Collections tab, select collects to give this user access to and what permissions they should have to each collection.
Click Save to invite the designated users to your organization.
note
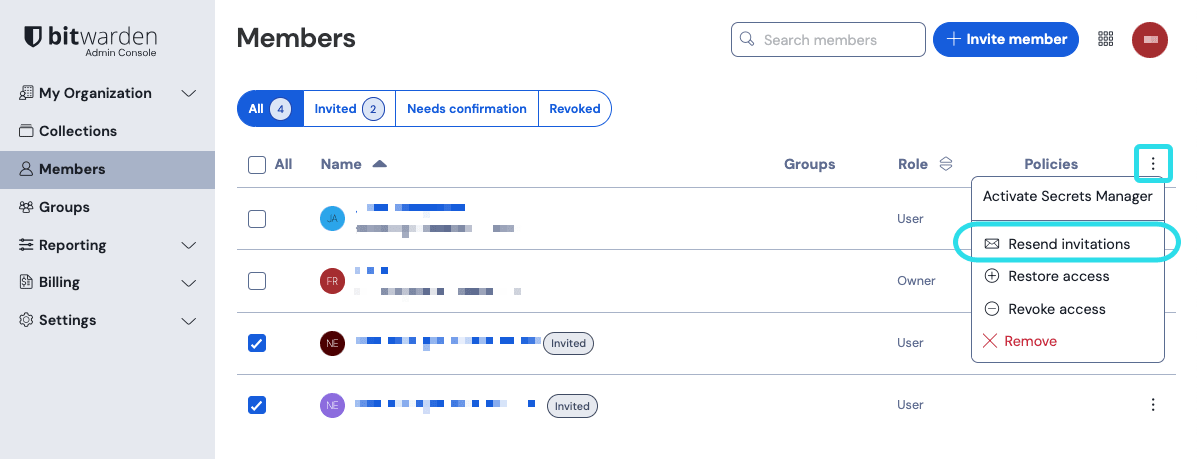
Invitations expire after 5 days, at which point the user will need to be re-invited. Re-invite users in bulk by selecting each user and using the options menu to Resend invitations:

If you're self-hosting Bitwarden, you can configure the invitation expiration period using an environment variable.
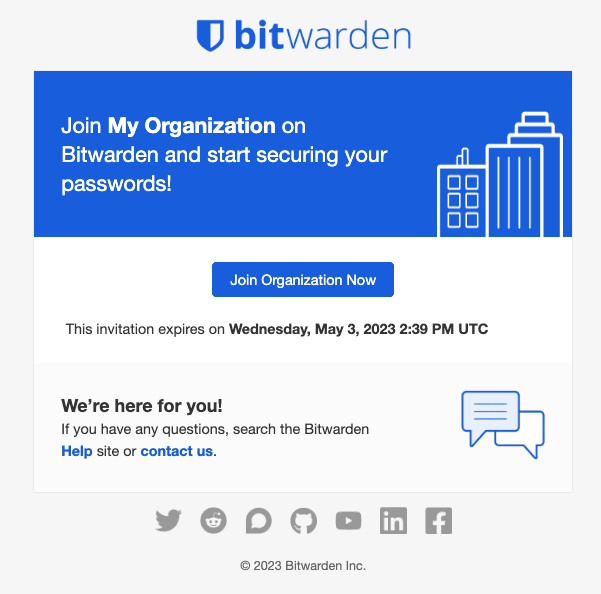
Invited users will receive an email from Bitwarden inviting them to join the organization. Clicking the link in the email will open the Bitwarden web app, where the user can log in or create an account to accept the invitation:

You must fully log in to the Bitwarden web app to accept the invitation. When you accept an invitation, you will be notified that you can access the organization once confirmed. Additionally, organization members will have their email automatically verified when they accept an invitation.
tip
The 3-step invite → accept → confirm procedure is designed to facilitate secure sharing between organizations and users by maintaining end-to-end encryption. Learn more.
To confirm accepted invitations into your organization:
Log in to the Bitwarden web app and open the Admin Console using the product switcher:

Product switcher Navigate to Members.
Select any
Acceptedusers and use the options menu to Confirm selected:
Confirm member to an organization Verify that the fingerprint phrase on your screen matches the one your new member can find in Settings → My account:

Sample Fingerprint Phrase
Each fingerprint phrase is unique to its account, and ensures a final layer of oversight in securely adding users. If they match, select Submit.
note
If Never prompt to verify fingerprint phrases has been toggled on, fingerprint phrase verification be reactivated by clearing the browser cache and cookies.
warning
For those accounts that do not have master passwords as a result of SSO with trusted devices, removing them from your organization will cut off all access to their Bitwarden account unless:
You assign them a master password using account recovery beforehand.
The user logs in at least once post-account recovery in order to fully complete the account recovery workflow.
Additionally, users will not be able to re-join your organization unless the above steps are taken before they are removed from the organization. In this scenario, the user will be required to delete their account and be issued a new invitation to create an account and join your organization.
Revoking access to the organization, but not removing them from the organization, will still allow them to log in to Bitwarden and access only their individual vault.
To remove users from your organization:
Log in to the Bitwarden web app and open the Admin Console using the product switcher:

Product switcher Navigate to Members.
Select the users you want to remove from the organization and use the Options menu to Remove:

tip
Offline devices cache a read-only copy of vault data, including organizational vault data. Some clients may retain access to this read-only data for a short period of time after a member is deprovisioned. If you anticipate malicious exploitation of this, credentials the member had access to should be updated when you remove them from the organization.
Removing a user from your organization does not delete their Bitwarden account. When a user is removed they can no longer access the organization or any shared items and collections, however they will still be able to log in to Bitwarden using their existing master password and access any individual vault items.
Depending on the particulars of your implementation, you may be able to use one of the following methods to delete a Bitwarden user account that belongs to a deprovisioned user:
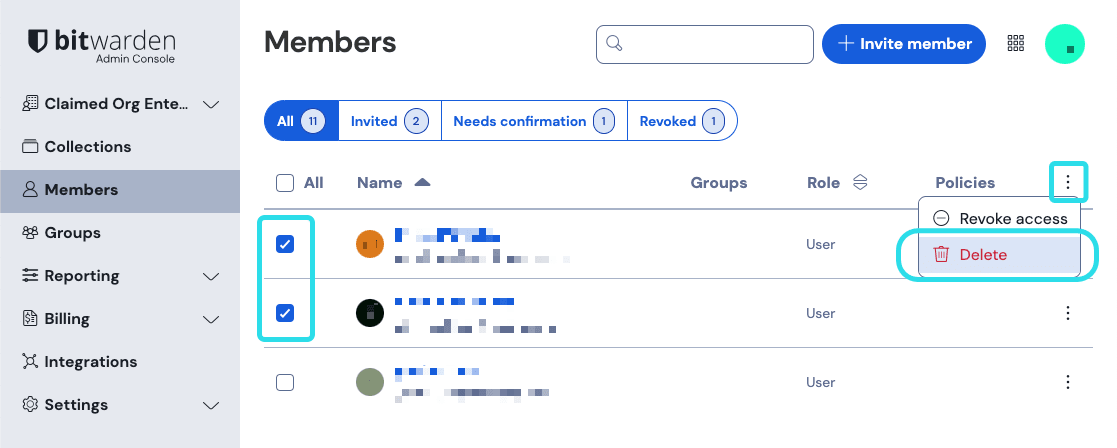
If you have a claimed domain, any users with account email addresses that have a matching domain (e.g.
jdoe@mycompany.com) can be outright deleted by organization administrators, instead of only being able to be removed from the organization:
Delete claimed accounts If you are self-hosting Bitwarden, an authorized admin can delete the account from the System Administrator Portal.
If the account has an
@yourcompany.comemail address that your company controls, you can use the delete without logging in workflow and confirm deletion within the@yourcompany.cominbox. For more information, see Delete an Account or Organization.
tip
If your organization has an active SCIM integration, user access to your organization is automatically revoked when users are suspended or de-activated in your source directory.
warning
For those accounts that do not have master passwords as a result of SSO with trusted devices, removing them from your organization will cut off all access to their Bitwarden account unless:
You assign them a master password using account recovery beforehand.
The user logs in at least once post-account recovery in order to fully complete the account recovery workflow.
Additionally, users will not be able to re-join your organization unless the above steps are taken before they are removed from the organization. In this scenario, the user will be required to delete their account and be issued a new invitation to create an account and join your organization.
Revoking access to the organization, but not removing them from the organization, will still allow them to log in to Bitwarden and access only their individual vault.
Instead of completely removing members, you can also temporarily revoke access to your organization and its vault items. To revoke access:
In the Admin Console, navigate to Members.
Select the members you want to revoke access for and use the Options menu to Revoke access:

Revoke access
tip
Only owners can revoke and restore access to other owners.
Users with revoked access are listed in the Revoked tab and will:
Not have access to any organization vault items, collections, and more.
Not have the ability to use SSO to login, or Organizational Duo for two-step login.
Not be subject to your organization's policies.
Not occupy a license seat.
To restore access to a user:
In the Admin Console, navigate to Members.
Open the Revoked members tab.
Select the users you want to restore access for and use the Options menu to Restore access:

Restore access
Users who are not compliant with certain policies will not be able to have their access restored until they take steps to become compliant. When you restore access to a user, they don't need to go through the invite → accept → confirm workflow again.
The 2FA status of users can be viewed from the Members page. If the user has a icon, two-step login has been enabled on their Bitwarden account.

Suggest changes to this page
How can we improve this page for you?
For technical, billing, and product questions, please contact support