Bitwarden Teams Trial Guide for Admins and Owners
A step-by-step guide to get the most out of your Bitwarden Teams trial.
- Resources
- Bitwarden Teams Trial Guide for Admins and Owners
Take these key actions during your trial to ensure a smooth onboarding experience for you and your team.
1. Save your first login
In your Bitwarden Vault you can store logins, credit cards, identities, and secure notes; these are known as Items. Logins are the most commonly stored Item-type and consist of a username, a password, the website domain associated with the login, and more.
Follow these steps to create and save your first login:
1. Log in to the web app
2. In the default All vaults view click the New button at the top right of your screen and select Item
3. Select item type Login from the dropdown
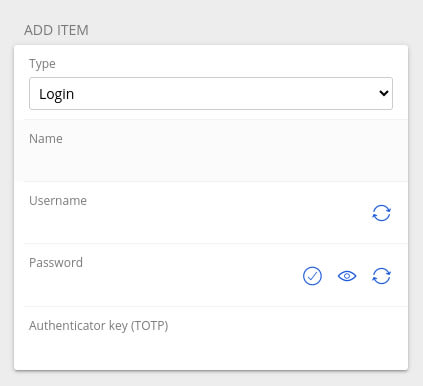
4. Fill in the required fields from memory, referencing your current password manager, or just make one up for practice!
5. Save the item
And just like that, you’ve created your first login. If you’ve been storing passwords in a notebook or on your notes app, you’ll need to do this for every new login. Start with your most sensitive ones (ie financial accounts) first!
If you’re coming over from another password manager, Bitwarden makes it easy to import items directly into your vault from most password managers or web browsers.
2. Create your first collection
A Collection is a shared space where businesses store vault items (logins, notes, cards, and identities) for secure sharing. Admins assign access to Collections by individual, role, or team. This allows employees to quickly access the passwords they need, whenever they need them.
For example, a Marketing Team might have a Marketing Collection that includes social media logins, credit cards for paid media channels, and secure notes with confidential team information.
Collections are the primary means to quick and secure sharing across teams and individuals.
To create a collection:
1. Log in to the Bitwarden web app, select the New button, and choose Collection from the dropdown:

2. In the Collection info tab give your collection a Name, and choose the organization it should belong to.
3. In the Access tab, assign access to any existing members or groups. For each selection, assign the appropriate level of permission. As the creator of the collection, you will have can manage permission.
4. Select Save to finish creating your collection.
During your trial, consider creating a few key Collections that you know you’ll need going forward. This will give you a head-start on your onboarding and enable you to quickly give access to the right people in your organization when you are ready.
3. Invite new members
Members are the people on your team who will be using the Bitwarden Password Manager.
Bitwarden is known for being easy to use and approachable for people of all technical skill levels. By encouraging and enabling Bitwarden use across your business, you are taking a significant step toward securing your organization.
Here’s how to invite new members to your organization:
1. Log in to the Bitwarden web app.
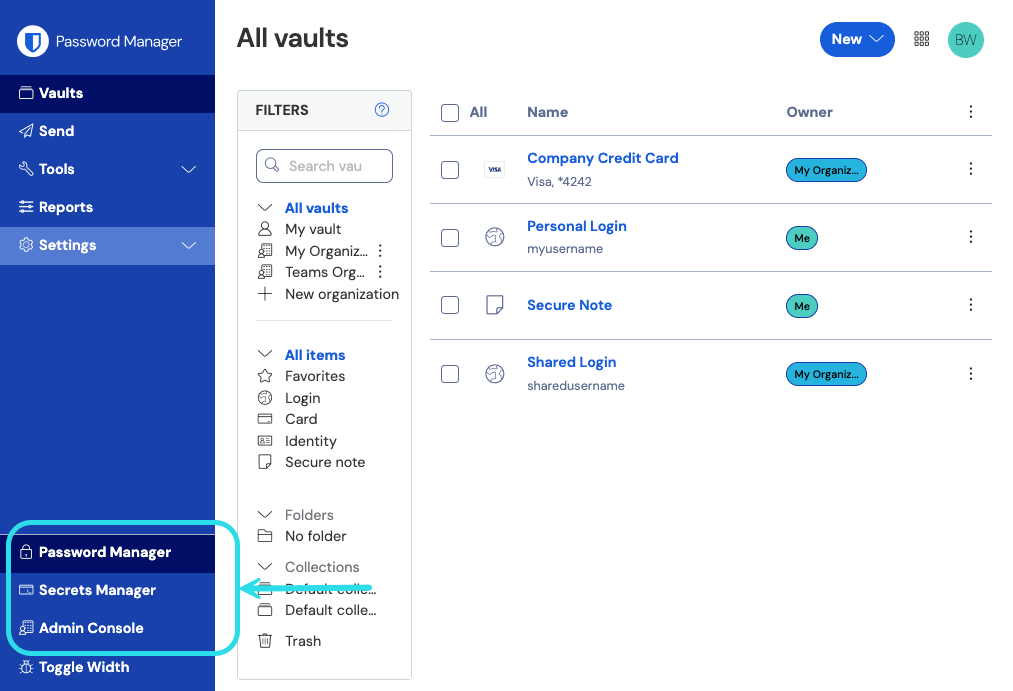
2. Open the Admin Console using the product switcher:
3. In the Admin Console, select Members from the navigation and use the Invite member button:
4. In the Role tab, enter the Email of your second member, which should match the email they signed up for Bitwarden with. Then, select a Member role.
5. In the Collections tab, select which collections to allow this user access to, as well as what the level of permission for each to give them.
6. Select Save to send the invitation to the designated email address.
Once your invitation is sent, inform your new member and help them accept the invitation.
Bitwarden provides on-demand support for Members in the Learning Center. Here’s a simple guide to share with new team members as you invite them to use Bitwarden.
4. Audit employee password practices
As the Admin for your organization, it is important to understand and improve employee password habits. Bitwarden makes this easy with Vault Health Reports.
Every Member in your organization has access to their own individual Vault Health Reports, but as the Admin you get a bird’s eye view of the entire organization’s password health (not their passwords).
To run any vault health report at the organization level follow the steps below:
1. Log in to the Bitwarden web app.
2. Open the Admin Console using the product switcher:
3. In your organization, select Reporting → Reports from the navigation
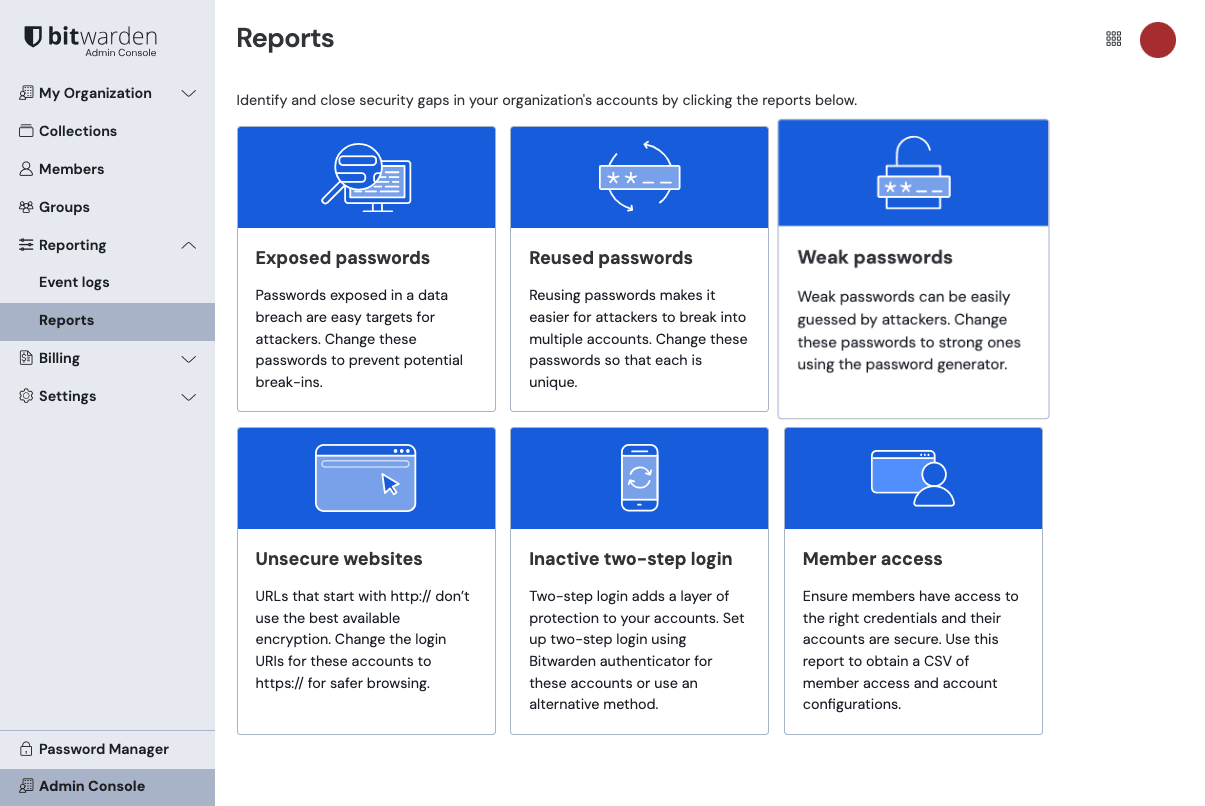
4. Click on any report to run it.
Just like that, you can see which employees are using exposed, reused, or weak passwords and for which accounts.
Pro tip: help members level up their own password security practices by encouraging them to run each of these reports in their own Vaults and correcting any issues that pop up.
5. Download Bitwarden on all your devices
Bitwarden is available everywhere. To get the most out of the password manager make sure you have it installed on any devices you might use for work.
Download Bitwarden on all your devices to unleash the full power of open source password management
Pro tip: use the Browser Extension to detect and save new logins, autofill usernames and passwords, and quickly insert 2FA codes.
Gain insight into exposed, weak, and reused passwords, unsecured websites, data breaches, and more. | Use Bitwarden Send to securely share encrypted information directly with anyone. |
Get an overview of user activity with exportable and timestamped event logs of your organization vault. | Set user permissions to access, edit or read items within a collection. |
Enhance security by requiring end-users to use a two-step login method to access their vaults. | Provision and deprovision accounts easily by connecting your existing directory service to your Bitwarden organization. |
Automate the management of members, collections, groups, event logs, and policies through the Bitwarden public API. | Access training for owners, admins, and end-users, and get 24/7 priority support whenever you need it. |
Explore the full list of Bitwarden business features here (note: some features may only be available in the Enterprise plan).
Set the stage for a successful deployment across your team
Join a live training or watch on-demand
Our weekly live demos and on-demand training options are a great place for you and your employees to build expertise.Educate users and set clear expectations
Educate end-users about the importance of adopting secure password practices (both at home and in the workplace) and communicate the steps in the deployment process so they can better prepare for change.Take advantage of the Help Center
The Help Center is your go-to destination for answers to your Bitwarden questions, and join the Bitwarden Community forums to share knowledge and tips with other security-minded users.
Get powerful, trusted password security now. Pick your plan.
Free
$0
per month
Free Forever - no credit card required!
Get a Bitwarden vault
- Unlimited devices
- Passkey management
- All the core functions
- Always free
Share vault items with one other user.
Premium
Less than$1
per month
$10 billed annually
Enjoy premium features
- Integrated authenticator
- File attachments
- Emergency access
- Security reports and more
Share vault items with one other user
Families
$3.33
per month
Up to 6 users, $40 billed annually
Secure your family logins
- 6 premium accounts
- Unlimited sharing
- Unlimited collections
- Organization storage
Share vault items between six people
Pricing shown in USD and based on an annual subscription. Taxes not included.
Teams
Resilient protection for growing teams
$4
per month / per user billed annually
- Secure data sharing
- Event log monitoring
- Directory integration
- SCIM support
Includes premium features for all users
Enterprise
Advanced capabilities for larger organizations
$6
per month / per user billed annually
- Enterprise policies
- Passwordless SSO
- Account recovery
- Self-host option
Includes premium features and complimentary families plan for all users
Get a quote
For companies with hundreds or thousands of employees contact sales for a custom quote and see how Bitwarden can:
- Reduce cybersecurity risk
- Boost productivity
- Integrate seamlessly
Bitwarden scales with any sized business to bring password security to your organization
Pricing shown in USD and based on an annual subscription. Taxes not included.